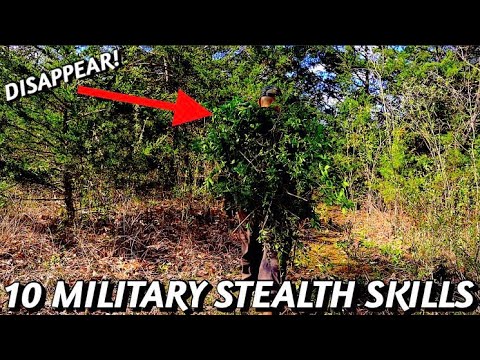
Here are 10 bushcraft tips and survival skills that you can apply in the wilderness. From the upside down fire for low-maintenance …
source
10+ Bushcraft Tips: Upside Down Fire | Survival Skills
 Pinterest

 Pinterest
Here are 10 bushcraft tips and survival skills that you can apply in the wilderness. From the upside down fire for low-maintenance …
source

Hope you enjoy folks! Watch more here: https://youtube.com/playlist?list=PLxnadpeGdTxAJy5_f_-6cjrAnuWRwUf8M
The upside-down-fire IMHO is one of the best inventions ever made, far superior to a usual tipi-fire. Even dry wood contains some 20% water and with a tipi-fire the heat goes up through a huge pile of wood, causing the water to evaporate/steam, reducing the temperature, disabeling the oil, resin and wax in the wood to ignite and create lots of gray or black smoke, which is highly toxic. Once the water is gone, the rest of the wood will burn away quickly in a raging fire. The upside-down-fire only dries out the top layer with very little smoke and allow the wood-gas to ignite, giving you an even, steady, prolonged burn. Due to the steady burn you can start boiling water almost imidiately after starting the fire – no need to wait for coals, wasting the heat.
The supply of oxygen is crucial to every fire, so for best results don't pack the wood tight, but leave some space between the logs (~0.5in.).
A sharp 90° spine on your knife is good for scraping (fat-)wood, but for striking a ferrorod on a regular basis, a designated striker is preferred. Striking a ferrorod as well as using it for a flint-and-steel will mess up the spine soon. I lately bought a set of HM-(hard metal= tungsten carbide) planer blades, ground a 90° with a diamond disc and now have some strikers that probably will never wear out.
BTW: the Terävä Jääkäripuukko is a phantastic knife, wish I had known about them earlier, would have skipped a lot of Moras.
Great vid
Thanks Mike, for you show us Bro, Saludos desde México.
Great video, Mike! Very informative
These are great tips for fire starting that upside down fire is very interesting I'd like to add something if you don't mind I have read and also found this to be true that guitar picks when lit are actually great sources of starting a fire what I've done in the past is put 3 or 4 guitar picks on a lighter and wrap them in electrical and that right there is my fire starting kit the lighter and the guitar picks along with the electrical tape
Extremely useful! 🏞️Great content, cheers.
you has fire res
Appreciate survivalist 💯
Thank You for the video Young Man,I also enjoy making fire 🔥 and meditate…
I like You because You are British
Which Ferro rod do you use ?
Hole in the ground fire is great in windy conditions
Great informative video. Looking forward to be seeing more videos. 🙂
Interesting and well made video. Thanks!
Hello 👋 my outdoors friend, thank you for sharing this informative video. All the best to you. Stay safe out there. 🤗
The outdoor long pants you are wearing are ~$200 for anyone that was curious. I know because I just bought a pair today and omg are they expensive
who doesn't like mike?!? your voice is so soothing bro!! great tips, as always!!!
Dear my brother, I do like your video very much from Cambodia 🇰🇭 . Your skill was teaching me every my camping. Can I reaction your video and share your skill to the world ?
😊i have a dog and there is nothing better to start fire than dry dog hair.
4:00 Tri-pod hanger. As a Boy Scout some decades ago, one of the camp "tools" we had to make up and use was a pothanger. In those years mattress chain was very common and very cheap (still widely used in UK for hanging baskets of flowers!), so still available. At each end we'd attach a hook made from one link unfolded. Loop one hook around the sticks above the tie point and down to the chain, and the other hook around the pot handle and back up the chain to the correct height you want. Perfect, and very flexible.
4:19 Hatchet. Oh yes, controversial subject. I'm afraid I'm not a fan, because I believe I can get by without one, in favour of a nice big camp knife (a love started all those years ago as a Boy Scout!). For cutting tools, I would have a different set of tools, which together, cover all the bases (in my humble opinion).
Firstly, and not negotiable, a folding saw (A Silky Gomboy if weight is a problem, or a Bigboy if not).
Then a large knife, 7" blade at least (my choice: Cold Steel Trail Master San Mai iii). This would most likely be attached to my pack while moving.
Also, I would have a belt knife which would be on my belt at all times (here I'd go for the CD SRK (sabre grind). This will deal with most medium size tasks around camp.
Lastly, I would also have a multi-tool for all those incidental tasks around camp or on the move (Victorinox Hercules). This I would carry on a lanyard and hanging inside my trousers pocket. The lanyard must have a snap hook for quick disengagement when needed.
These four together would not weigh much more than an axe and pouch, and be much more convenient to carry and use, and much more flexible. (Although, I must admit an axe is a lot of fun to use!).
Thanks for a very interesting video.
Ahhhh! How EASY to set up camp in IDEAL WEATHER…..everthing dry,,weather not an issue,,so so easy
When I was tough this fire method, it was called "the log cabin fire lay"
Anyone else here just to get this into his brain before a boy scout
Thats how you build a fire. Always
Um bom video, una verdadeira aula de bushcraft, obrigado.
Like your content alotbof youtubers seem to only show knives and firelighting same thing over and over people heres a channel you can learn something off
You can make the upside down fire last a lot longer if you fill the gaps in each layer with a bit of dirt. This reduces the airflow, so it will burn slower and the flames need longer to get to the next layer. Especially on windy days this is helpful.
2.3 million subs. Amazing brother. I joined with like 10k. Lots of hard work you’ve put in. Well deserved my friend. D😎🤙🇺🇸
man this channel seriously gonna save my life one day.
"It does say they are biodegradable, but I still take them home to dispose of" Good man! Another fantastic video.
I love these quick tip videos they’re so full of knowledge in a short and very well organised format. One thing I would love to see is all your different bits of kit laid out in evolution i.e. how you came to find that canvas tent/poncho and what bit of kit you were originally using that led to it/other items. I know for example you probably use a different knife, axe or saw from when you started but I’d love to see your journey from where started to now through the kit you use.
I knew most of these but I still enjoyed the excellent video. Always good to refresh knowledge. Didn't know about the grass in among the moss so a great piece of new learning. Thanks. Keep up the great work
this is such a fantastic video..
Brilliant video.. I'm forever learning every day.. Bushcraft, wildcamp,servival an foraging these skills we all should know 😊
this was a good video just need to know how to keep the fire going for a long time
😀
Dp you have another channel called fiftyonenorth